This post may include affiliate links. As an Amazon Associate I earn from qualifying purchases.
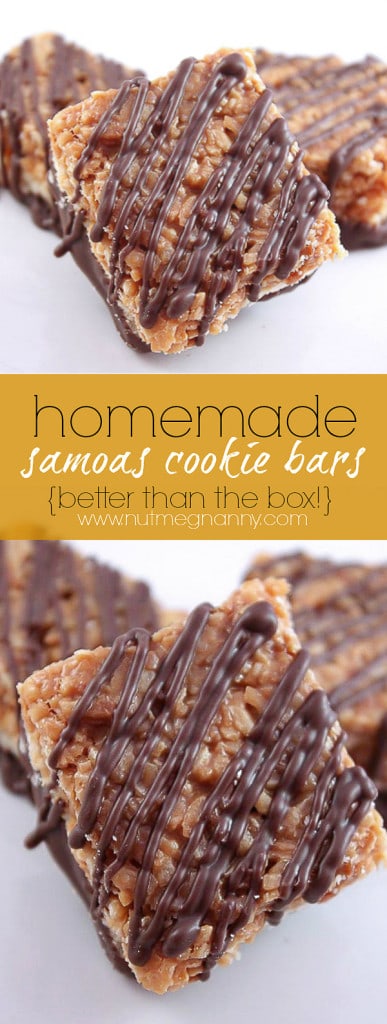
These homemade girl scout cookies samoas bars are the perfect cookie substitute. So simple to make and packed full of coconut, caramel and chocolate flavor.

I love love love love girl scout cookies. I swear. I could eat a box at a time. I probably shouldn’t admit to that….
Anyway, now that we have established that I love girl scout cookies I’m also betting that there are others out there who love them as much as I do. My favorite one of their cookies is hands down the Samoas. They have such a delicious crunchy bottom topped with a chewy coconut topping. Plus not to mention the addition of chocolate…yum!
I have been eying Baking Bites homemade samoas bars recipe for over a year. I’m not sure why it took me so long to make these gems but I finally got around to it yesterday. Amazing. Horribly amazing. The reason I say “horribly” is because all I wanted to do was eat them last night. I had to stop myself at two and boxed the rest up for Mr.NN to take to work. I was not going to be left home with all those bars today….it would not have been good….

Homemade Samoas Bars

Ingredients
For Cookie Base:
- 1/2 cup sugar
- 3/4 cup unsalted butter, room temperature
- 1 large egg
- 1/2 teaspoon vanilla extract
- 2 cups all purpose flour
- 1/4 teaspoon kosher salt
For Topping:
- 3 cups shredded sweetened coconut
- 12 ounces chewy caramels, unwrapped
- 1/4 teaspoon kosher salt
- 3 tablespoons whole milk
- 10 ounces dark chocolate chips
Instructions
For cookie crust:
- Preheat oven to 350 degrees F.
- Lightly grease a 9×13-inch baking pan or line it with parchment paper.
- In a large bowl, cream together sugar and butter, until fluffy.
- Beat in egg and vanilla extract.
- Working at a low speed, gradually beat in flour and salt until the mixture is crumbly, like wet sand. The dough does not need to come together.
- Pour crumbly dough into the prepared pan and press into an even layer.
- Bake for 20-25 minutes, until the base, is set and the edges are lightly browned.
- Cool completely on a wire rack before topping.
For topping:
- Preheat oven to 300 degrees F.
- Spread coconut evenly on a parchment-lined baking sheet (preferably one with sides) and toast for 20 minutes, stirring every 5 minutes, until the coconut is golden.
- Cool on the baking sheet, stirring occasionally. Set aside.
- Unwrap the caramels and place them in a large microwave-safe bowl with milk and salt.
- Cook on high for 3-4 minutes, stopping to stir a few times to help the caramel melt.
- When smooth, fold in toasted coconut with a spatula.
- Put dollops of the topping all over the shortbread base.
- Using the spatula, spread the topping into an even layer. Let topping set until cooled.
- When cooled, cut into 30 bars with a large knife or a pizza cutter (it’s easy to get it through the topping).
- Once the bars are cut, melt the chocolate in a small bowl. Heat on high in the microwave in 45-second intervals, stirring thoroughly to prevent scorching.
- Dip the base of each bar into the chocolate and place it on a clean piece of parchment or wax paper.
- Transfer all remaining chocolate (or melt a bit of additional chocolate, if necessary) into a piping bag or a Ziploc bag with the corner snipped off and drizzle bars with chocolate to finish.
- Let the chocolate set completely before storing it in an airtight container.
Nutrition
Nutrition information is automatically calculated, so should only be used as an approximation.


Where did I do wrong?
I had two problems. Some shortbread separated from the caramel when I cut the bars and then on others it just crumbled when I tried to dip them. I iced the chocolate on the bottom. I am guessing they will taste great, but looks not so good
I had that same problem, foodlady. Wondering what I can do differently next time to keep it from happening.
These were amazing – I made them for a party and everyone loved them! Thank you!
https://girl-dog-oven.blogspot.com/2011/03/end-finally-homemade-samoas.html
Thank you so much! I’m so glad they were a big hit 🙂
These mustn’t be available in Canada, I’ve never seen them.
I just made these! Thanks so much for the recipe. It was time-consuming but fun! My coconut/caramel mixture was a little drier than I expected, but it stuck to the cookie layer just fine. I used milk chocolate on the bottom, but it didn’t set up as easily, so I switched to semi-sweet chocolate for the decoration on top.
Made these today and they tasted great!
I made these today and was quite happy with them. I did make some minor changes based on personal preference.
I used a whole 14oz bag of coconut, and probably 16oz of caramel, 4TB half and half because it’s what I had. I did not dunk the bottom of the bar in chocolate. Just drizzled on top so it isn’t too overpowering and the coconut shines through.
Will definitely make again, and If I had been thinking ahead, I would have sprinkled red and green sprinkles on top for Christmas.
Highly recommend using an oversized parchment sheet in the pan. Makes it super easy to lift out to cool the cookie down, then put it back in the pan once cool and makes it easy to add the coconut/caramel mixture. I pushed down on the coconut mix to smooth it out. Stuck in the fridge then lifted out again and put on a cutting board. I cut into 48 squares and separated them slightly, still on the parchment. Drizzled chocolate over them. Then put in a container once the chocolate firmed up. Made clean up a breeze!